This article isn’t designed to sell you on the benefits of TDD, it is simply a tutorial (in Java and JUnit) to get you acclimated to the typical workflow. TDD can be counter-intuitive, so we’ll go slow and keep it simple.
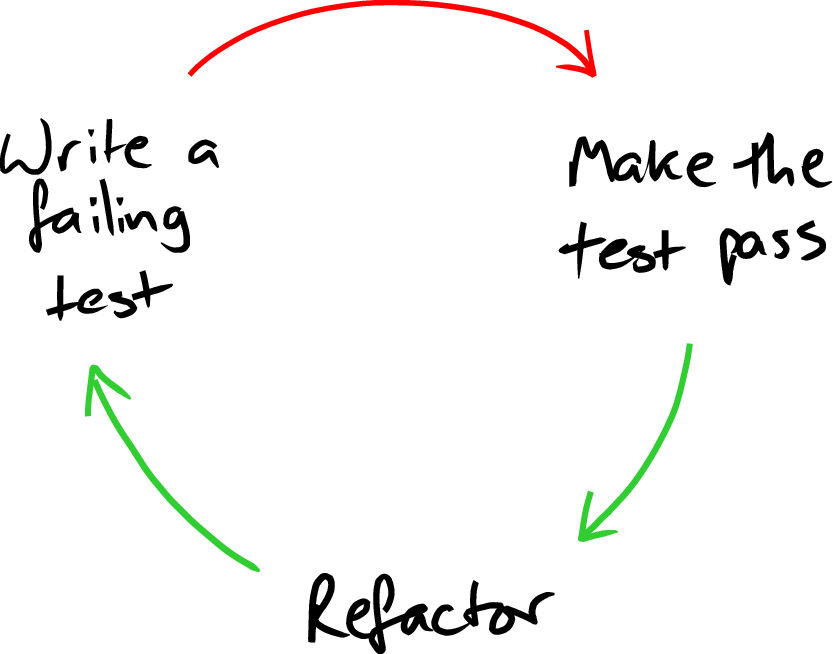
Test Driven Development, or TDD, is a development process that involves writing tests before code. The typical process is captured in the featured image of this article: Write a failing test, make the test pass, refactor. When first working TDD into your normal development workflow, it may seem weird at first. Indeed, it is generally accepted that teams adopting TDD lose velocity at first (the speed in which they develop) so don’t worry if you don’t get it at first.
The point of this article is to give a beginner level introduction to TDD that a novice programmer can understand so that if you decide you want to develop this way, you will have the general building blocks needed implement TDD into full-blown projects. To understand this tutorial, you only need to understand how to create a new Java project and make functions, I will explain the rest.
We are going to make a very simple program that adds two numbers. Again, this is super basic stuff on the Java side of things, we are only trying to learn TDD today and the processes we learn will apply to any programming language.
Getting Set Up
Go ahead and make a new Java project and call tdd_tutorial. I’m using IntelliJ, so my hierarchy looks like this:
tdd_tutorial
|_src
  |_ com
     |_company
       |_Main.java
If you’re following along, go ahead and copy my structure, otherwise, do it the way you feel is best. Either way, inside of com.company, make a new directory called tests and a file inside of it called MainTest.java.
Quick Note About Project Structure
There’s lots of ways to structure a project and the above structure may not be ideal. The two things about this structure that are important is that your tests are separate from application code, and that test files reflect the name of the class being tested, and the word Test. That’s why we made a tests/MainTest.java file, because we will be testing functions we write in the Main class.
Make Sure Our Files Have the Boilerplate Stuff
My IDE is doing most of this stuff for me, but just in case you’re following along in a text editor, let’s make sure Main.java and MainTest.java look right.
Main.java should look like this:
package com.company;

public class Main {

    public static void main(String[] args) {
    }
}
And your MainTest.java should look like this:
package com.company.tests;

import static com.company.Main.add;
import static org.junit.jupiter.api.Assertions.*;

class MainTest {
}
With that out of the way, let’s get started!
Step 1 – Write a test
Remember in TDD our first step is to write a test that fails. In MainTest.java, create a new method called test_add and annotate it with @org.junit.jupiter.api.Test. Like this:
@org.junit.jupiter.api.Test
    void test_add() {
    }
Ok, this is where we start thinking like test-driven developers. First, we know that we’re going to be writing an add function that sums two numbers, so how would we go about implementing that? Well, I’m thinking the function will probably take two numbers and return their sum. Nothing fancy, that’s all it’s going to do.
How will we know this function works? Well, I know that 1 + 2 is 3, so we’ll know the function works when we pass 1 and 2 and get 3 back in return. Pretty simple, so let’s put it in code. In the test_add function, write:
int input_1 = 1;
int input_2 = 2;
int expected = 3;
These variable names should be self evident. We’re going to feed our function input_1 and input_2 and we expect expected to come of it. Now, let’s call our existing function and assign it to a variable called actual. After the int expected... line, write:
actual = add(input_1, input_2)If you’re using an IDE, it’s probably highlighting add in red. That’s ok, it’s because we haven’t made that function yet.
Now, the “testing” part. We’re going to use a method from JUnit called assertEquals, which requires two inputs: expected and actual. This method is what decides if the test has passed or failed. If both numbers we pass are the same, it will pass, if not, the test will fail. At the end of the function put:
assertEquals(expected, actual);And that concludes the writing of our first test. Let’s run it. If you’re using an IDE, there is most likely something you can click to run the test. If you need to use the command line, it’s a little trickier. First, the JUnit jar file has to be in the classpath. If it is, run this from your project root:
javac -cp junit-jupiter-api-5.5.2.jar;. src\com\company\tests\MainTest.javaYou should get a failure from these that looks like a build failure. Again, this is expected because we have not actually created the add function yet. Our first step was to write a failing test, so congratulations, you’re one-third of the way done with your first TDD iteration!
Note if you’re having some problems with running this from the command line, check out this link and try to get set up.
Step 1.5 – Get Test to Meaningfully Fail
Ok ok I know I promised there was only 3 steps but lets be honest, our test only failed because the build failed. We want to actually make sure our function is being tested properly so let’s go ahead and get the test to fail the right way. In your main function, just under the closing bracket for the Main function, write:
public static int add(int x, int y) {
    return 1000;
}
We made the function so our project will actually build and we intentionally made it return 1000 because we want to make sure the test actually fails if it’s not implemented correctly. Let’s run the tests again and see what happens:
org.opentest4j.AssertionFailedError: Nope ==>
Expected :3
Actual   :1000
Excellent! We have a truly failing test.
Step 2 – Make the Test Pass
Now we’re going to write our actual add function. This is pretty straightforward, so inside the function write:
int sum = x + y;
return sum;
Running the test again should give us a pass, let’s try it out:
Tests Passed: 1 of 1 testAwesome.
Step 3 – Refactor
Now that we know our test will pass if it’s right and fail if it’s wrong, we are free to refactor and make the method better. So instead of adding x and y together and assigning them to a variable that we return, let’s just go ahead and return x + y. See:
public static int add(int x, int y) {
        return x + y;
    }
One less line, but it looks better now. Run the tests again and make sure we didn’t break anything. You should get a passing test!
One More Round
That’s great for adding integers. Let’s make one more function for adding which handles decimals. What’s step one? Write a failing test! In MainTest rename the first test to test_add_integers and make a new function called test_add_decimals:
@org.junit.jupiter.api.Test
void test_add_integers() {
    int input_1 = 1;
    int input_2 = 2;
    int expected = 3;
    int actual = add(input_1, input_2);
    assertEquals(expected, actual);
}

@org.junit.jupiter.api.Test
void test_add_decimals() {
    double input_1 = 1.5;
    double input_2 = 2.5;
    double expected = input_1 + input_2;
    double actual = add(input_2, input_2);
    assertEquals(expected, actual);
}
Right away we should have some problems. This is because not only are we passing doubles to a function expecting integers, we’re also assigning a double variable the output of an integer function. So writing our failing test step is done. On to step two, make the test pass!
In Java, we have the luxury of function overloading. This is the feature in which we can have two or more functions with the same name so long as their signatures are unique. In other words, we can have multiple add functions as long as the inputs and return values are different from the others. Let’s make one for doubles:
public static double add(double x, double y) {
    return x + y;
}
Run the tests again, you should now have two passing tests, awesome! What about step 3? Refactor? Well, our test code could actually use some cleaning up. Let’s take out our expected and actual assignments and rename our inputs:
@org.junit.jupiter.api.Test
void test_add_integers() {
    int x = 1;
    int y = 2;
    assertEquals(x + y, add(x, y));
}

@org.junit.jupiter.api.Test
void test_add_decimals() {
    double x = 1.5;
    double y = 2.5;
    assertEquals(x + y, add(x, y));
}
Nice, we reduced the size of the tests and we know if we broke something, the tests will fail because we already know the current implementations of add work. Run the tests again, you should get 2 passes again, if not, make sure you copied everything right.
Conclusion
I love TDD because it facilitates refactoring. As programs get more complex you may decide you want to implement a better code structure to make things more readable and intuitive. Doing so can be error prone, but if you’ve already got a suite of tests that you know will pass, you can be reasonably confident that you’re refactoring correctly.
Have fun, and as always, let me know if you have any questions!